
If you enjoy this post, please retweet it (Twitter/X), boost it (Mastodon), repost it (MeWe), or repost it (BlueSky).
I announced my FASA Star Trek RPG VTT some time ago, but all it represented was a digital battle map that can be used standalone. Now, the second component has made enough progress to release the beta version. I call the second component Bridge. It manages the master control panels, which are analogous to character sheets but for starships, using the second edition ruleset. While also able to be used standalone, using them together is where they really shine. Before explaining how to use Bridge with the VTT, let me first give you the very basics as to how to use the system, then point you to the VTT help file that provides more details.
Some of what I describe here won’t make sense until you read the section below entitled, “It’s Not All Good News.” I’ve tried to identify and label all such items “(q.v.).” Also of note, I often assume you know how to play the game (2nd edition rules).
VTT
- Open the VTT at https://fasastvtt.gamerssyndicate.net/vtt/.
- Play with the default test ships if you want to get the hang of things, but when you’re ready . . . .
- Click Join Room on the right-hand menu.
- Enter a room number, your name (must be unique per room number), a password for your other players to use to enter, select Create New Room, and enter an admin password (must be different from the regular password) that allows you to retake control of the room if you’re dropped. Your players will ignore the checkbox and admin password
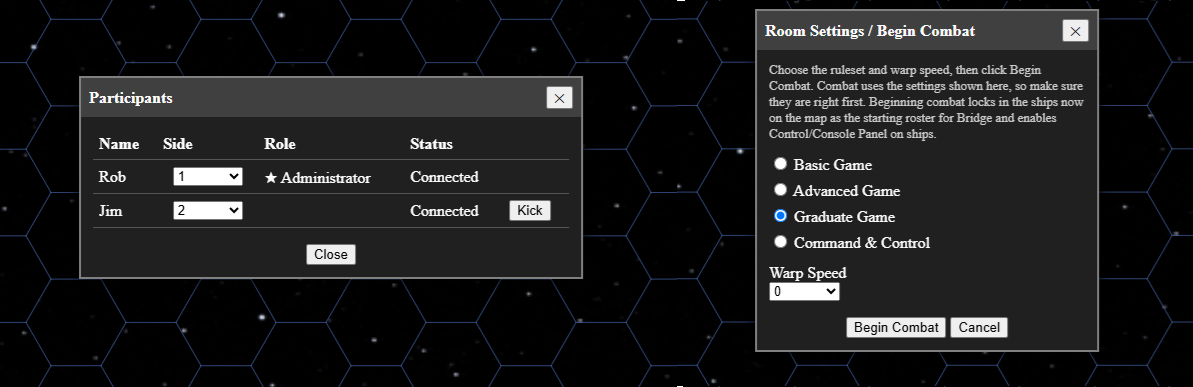
- As admin, when you create the room, you’ll be given a participants dialog box (see image below) where you assign each player to a side. Even if two players are playing allied forces, it will be better if they’re treated as different sides. You should wait until everyone has joined before closing the dialog box, but you may always reopen it by clicking Participants on the right-hand menu.
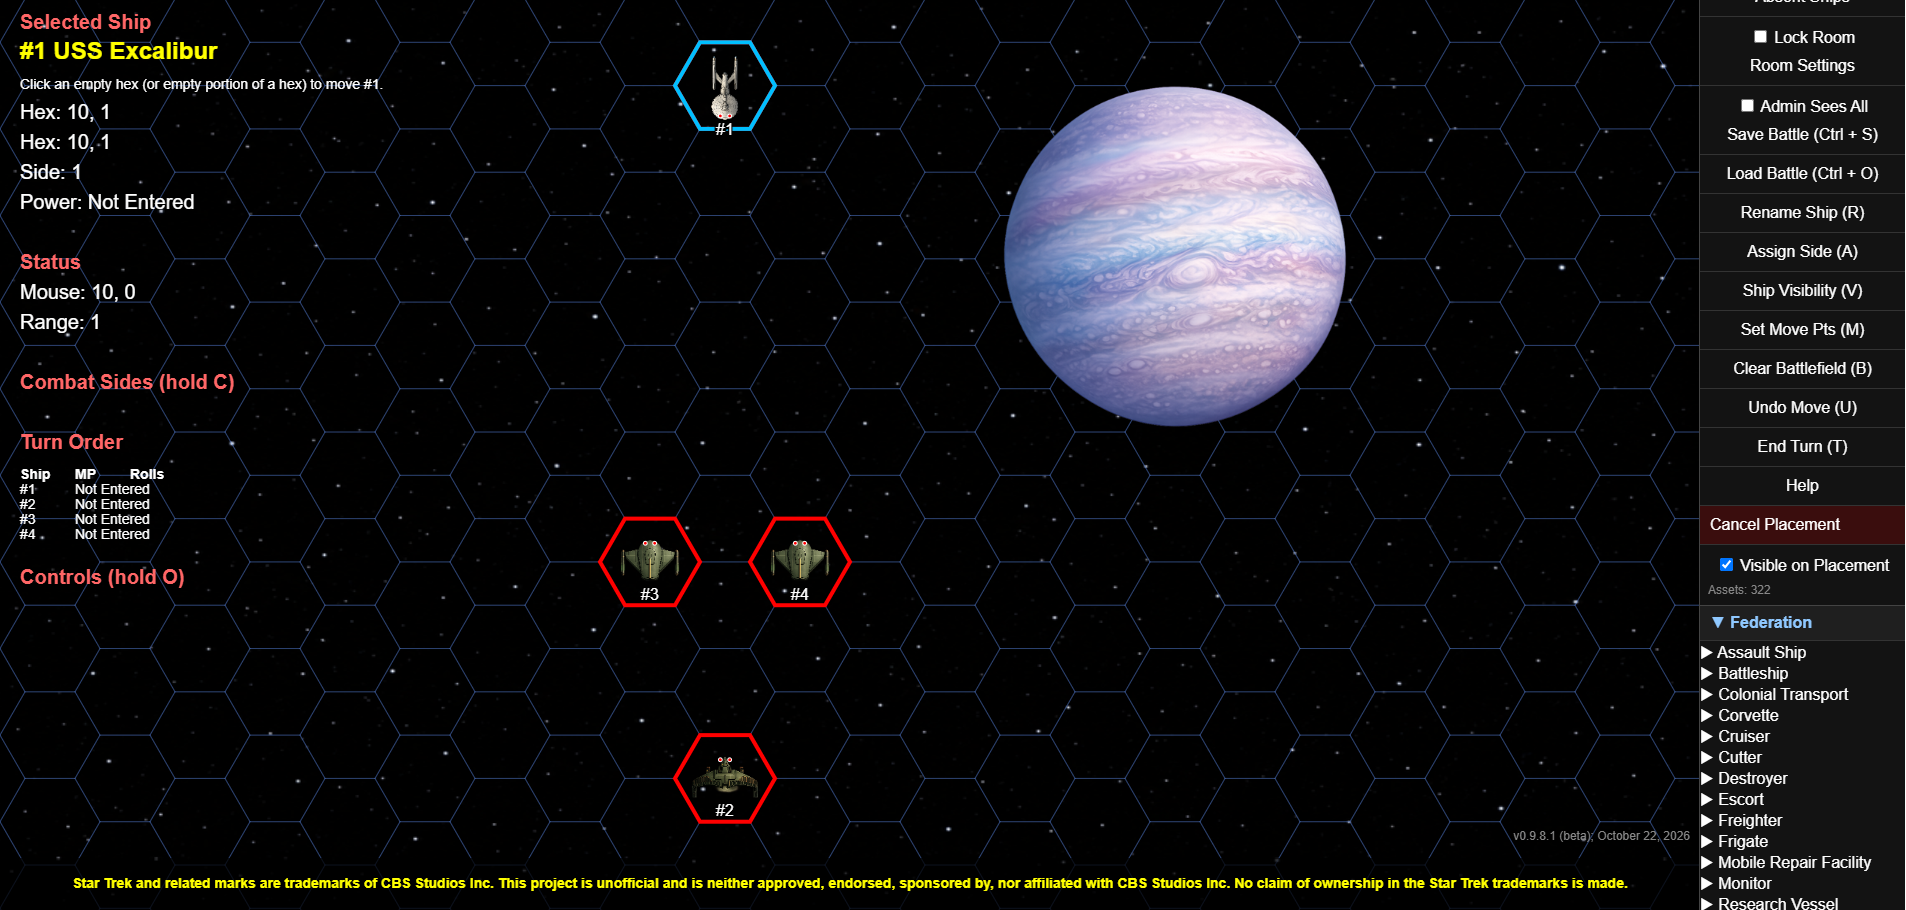
- Once a player (including the admin) is assigned a side, that player can start placing ships on the battle map. If you want the ship to initially be invisible when placed, make sure Visible on Placement is unchecked. Uncloaked ships should be visible from the start (unless hidden behind a planet, etc.), so make sure that check box is checked if your ship isn’t going to be cloaked to start the encounter.
- To add a ship, go to the bottom of the right-hand menu, find your government, expand the menu, find the ship type, expand that menu, then click on the relevant ship. This places you in Placement Mode. Click on a hex, and the ship’s silhouette will be placed. You may also add “obstacles,” which include stars, planets, moons, asteroids, wreckage, anomalies, black holes, and space dust, all of varying sizes. When you’ve placed all your assets, click the slowly flashing Cancel Placement button on the right-hand menu.
- Right click on your ship to change its name, side, controlling player, visibility, movement points (unnecessary with Bridge), or delete the ship altogether. (Clicking Clear Battlefield on the right-hand menu clears all ships, but only the admin can do that.
- If the admin isn’t playing as a GM, the admin should uncheck Admin Sees All on the right-hand menu so that cloaked ships and ships behind obstacles are invisible to the admin.
- You can use the Participants dialog box to boot an unruly player, then check the Lock Room checkbox on the right-hand menu to require admin approval before letting someone back in the room even if they know the password. If they keep spamming you with requests to enter, you can click ignore to ignore their future requests.
- Finally, click Room Settings on the right-side menu to open the Room Settings dialog box (see image below) assign a ruleset (avoid C&C for now) and warp speed at which the encounter takes place.
- Need more help? Click the Help button on the right-hand menu, which will take you to https://fasastvtt.gamerssyndicate.net/vtt/help.html.
If you’re ever stuck wondering how to do something, hold down the O key, and you’ll see a partial list of controls appear on the left side of the screen. These include controls for manipulating the battle map itself (e.g., zoom in, zoom out, panning). The left side display includes a lot of useful information, so make sure to take a look at it.
Bridge
This application doesn’t have a help file, so it’s going to take a bit more to help you along with it. Still, I think a lot of it is intuitive, so you may just want to learn through doing rather than reading about it. In case not, here’s some help with some visual aids.
First up is the top of the screen and your engineering panel.
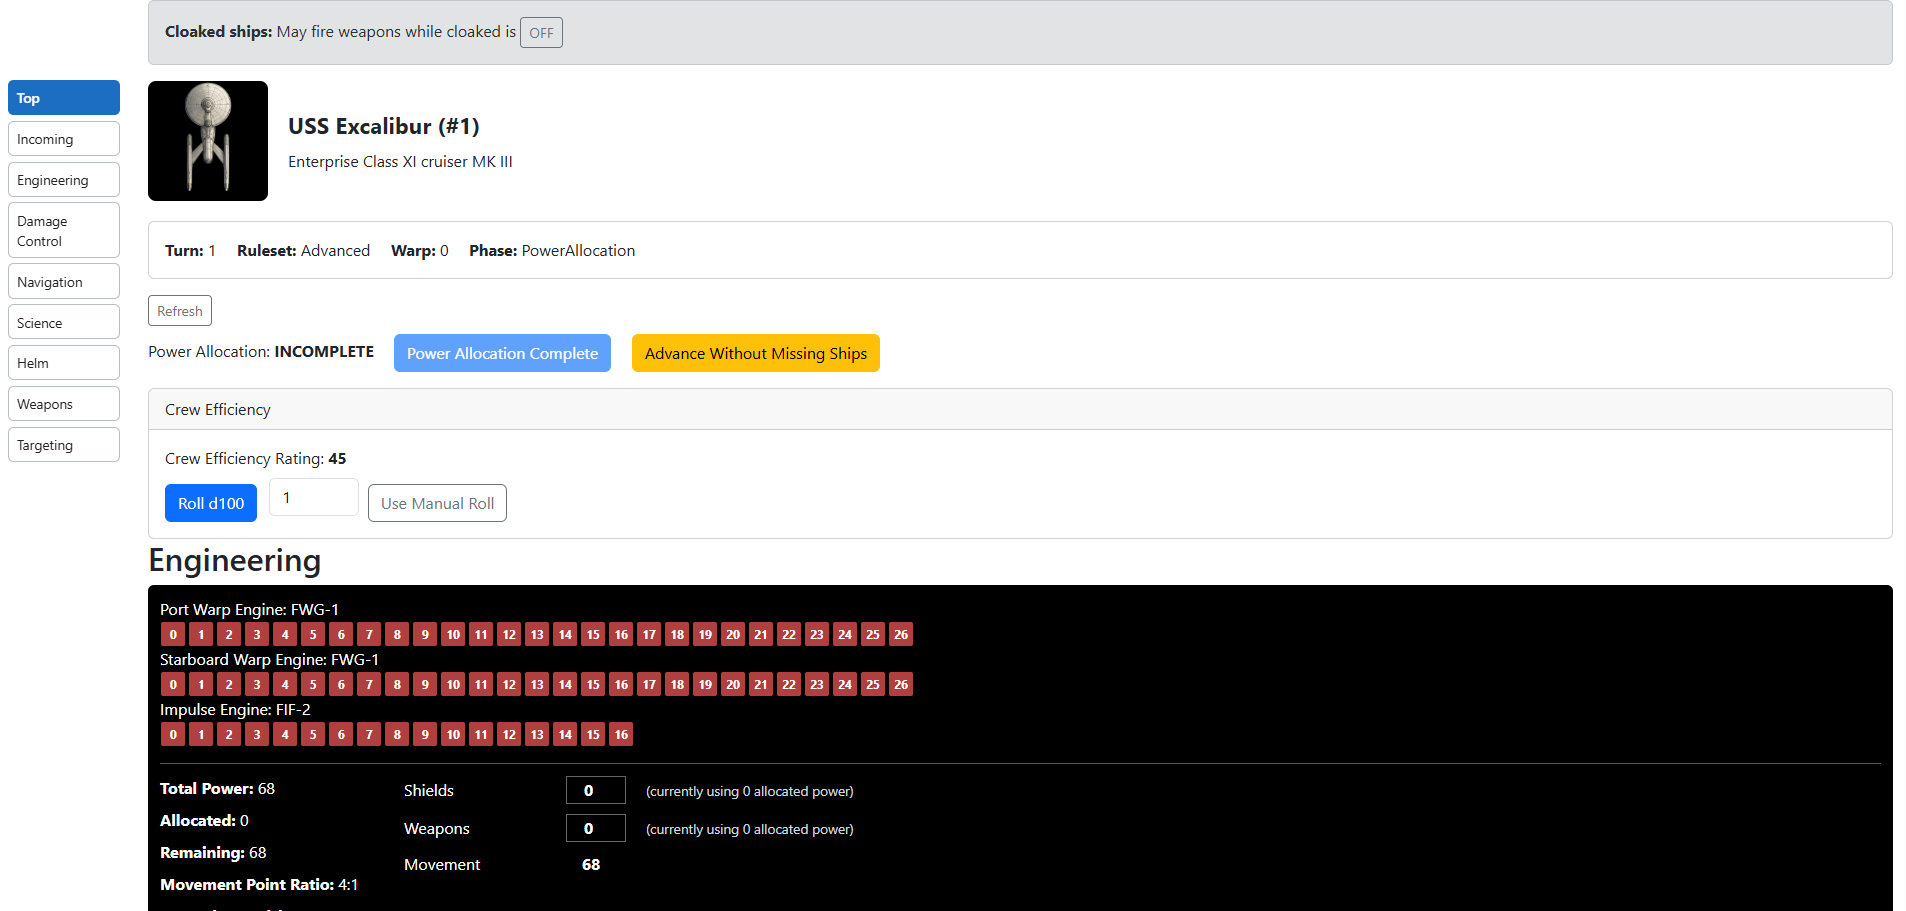
The top identifies your ship, the turn number, rule set, encounter speed, and phase. It also provides for skill rolls (crew efficiency in Advanced and Graduate; Skill Rolls in C&C) and later will provide for other decisions (q.v.) generally reserved for the Captain. Once we have a Captain’s Console (q.v.), these will be far better organized. As you can see, you may roll automatically or roll with dice and enter your roll manually. The admin/GM will eventually be able to forbid manual rolls, but for now, they’re allowed. If you don’t want to use them, you don’t have to. Just agree not to use them until the switch is enabled.
You’ll also notice the yellow button. Sometimes there are six ships on the battle map, but only four are currently fighting (e.g., the other two represent a second wave of ships that enter in turn 3). In that case, the game gets held up because not all ships have allocated power yet. The Advanced Without Missing Ships button appears on all of the admin’s ships and allows the admin to advance the game without the missing ships. The missing ships won’t be able to join combat until the first phase of the following turn. If they attempt to enter early, they’re placed in a waiting room with a disabled Join button that becomes enabled as soon as they’re able to join.
Below these is the Engineering console. There, you enter the amount of power allocated to shields and weapons (and cloaking device if you have one), with the remaining available power automatically being allocated to movement. To the left, it warns you if you’re wasting power because of the movement point ratio. That is, if your movement point ratio is 4/1, but the amount of power to movement is not evenly divisible by four, then you’re wasting some power points. Also, using the menu on the left side of the screen, you may jump to the Weapons console and arm weapons before allocating power to weapons, then jump back to the Engineering console where you’ll be told how much power you allocated to weapons. That makes it easy to enter the correct allocation. With shields, you must allocate power before you can assign shield points, so jump to Navigation, look at your shield point ratio, and allocate accordingly.
If you lower your allocation to shields after assigning shield points or fail to allocate weapons, or fail to execute your skill rolls, the Complete Power Allocation button will be disabled. Once those three tasks are performed, the button will be enabled, and you should click it. Then you’ll be jumped automatically to the Science console for the Sensors phase (or to the Helm in the Basic ruleset).
Next up are the Navigation and Science consoles.
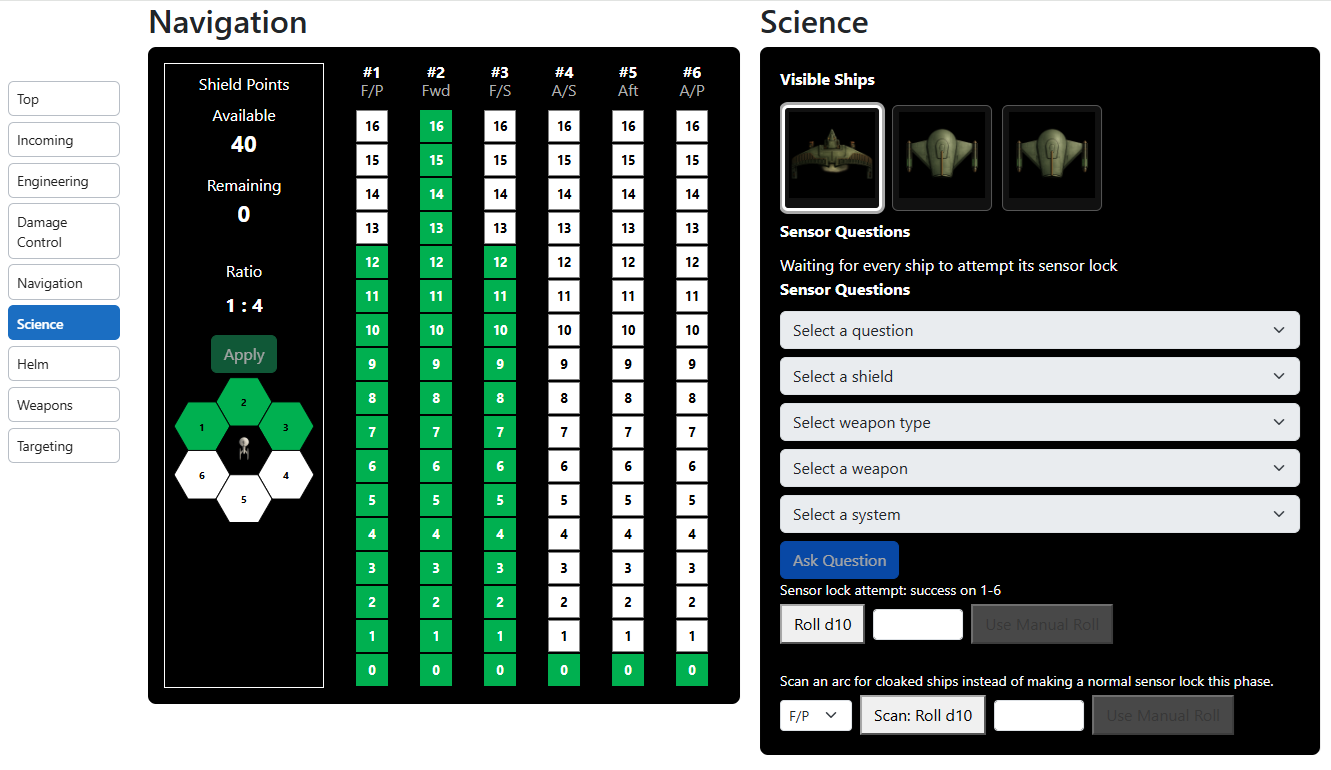
Navigation: You’ll be told how many shield points you have available to allocate. Allocate (or deallocate) them by clicking the appropriate lamp. (I call these lamps because they’re meant to emulate the lights on the original series consoles.) A few notes. If a shield generator is damaged, the lamps will all be red. If destroyed, they’ll become very dark grey (essentially black). If the shield is hit and temporarily expended, the amount by which it’s been expended will turn yellow. Finally, if power has been temporarily reduced due to engine damage, the lamps will turn orange (with green lettering) to the extent they’re reduced in power. If the engines are repaired during the current turn, the lamps will light green again.
Science: Outside of Basic, you have two choices for sensors. First, you may select a visible ship and attempt to lock onto it. If you succeed, the first dropdown list (“Select a question”) will be enabled, and depending on which question you select, another dropdown list may be enabled for follow up. Second, you may instead search for cloaked ships. You must select an arc to search, and then roll to see if you detect anything.
Now, on to the Helm.
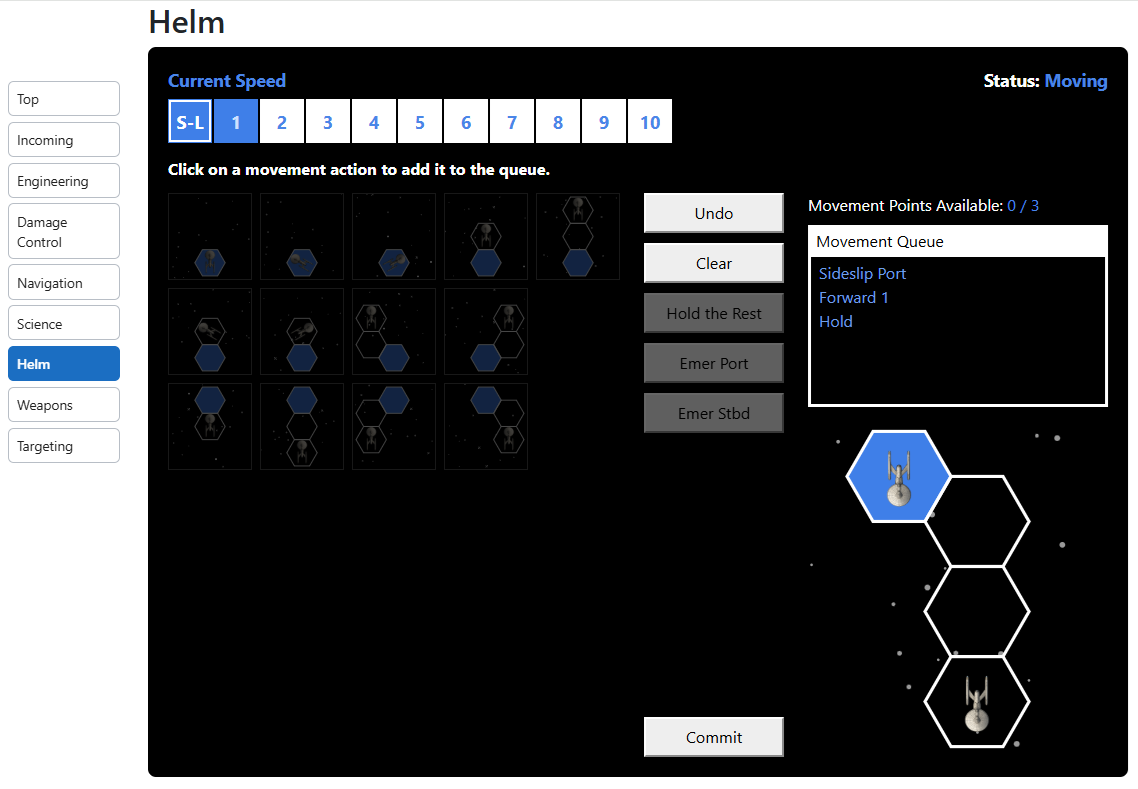
At the top left, you see the current speed of the encounter highlighted and outlined. You also can see the speeds you can change to without a skill roll (highlighted but not outlined). To the top right, you can see that it’s your turn to move. Other ships will have the message, “Waiting on ship #1 to complete movement.” In fact, similar messages will appear throughout the control panel so that if someone doesn’t realize it’s their turn, you may (politely, I hope) let them know that everyone is waiting on them. To the left, you can see diagrams showing the various legal movements available, each costing a movement point to execute. These will be lit up and selectable. Selecting one moves that action into the queue on the right, then adjusts the hex diagram to show how the ship will be repositioned on the map once you’ve made your final decision. None are currently lit up because all movement points have been used to queue actions. Also, this helm was printed in Basic, so the third row (reverse movement options) aren’t present. If you moved forward in this or the last movement phase, then the reverse movements will be unavailable and thus dimmed out. As for the buttons, clicking undo removes the last entry in the queue, clicking clear removes all entries in the queue (essentially starting over), clicking Hold the Rest fills the rest of the queue with holding station (if you have more movement points than you need for the phase), and Emer Port and Emer Stbd are enabled if making an emergency heading change is available at the moment (along with a warning in red text as to the damage your ship will take from the stress of such a heading change). Once you’re satisfied with how your ship will be moved, you should click Commit, your ship’s bearing and position will be updated on the VTT, and the next player in tactical order will then have their Helm enabled after reviewing how you moved.
Here’s an image from the Graduate ruleset showing some of the missing features.
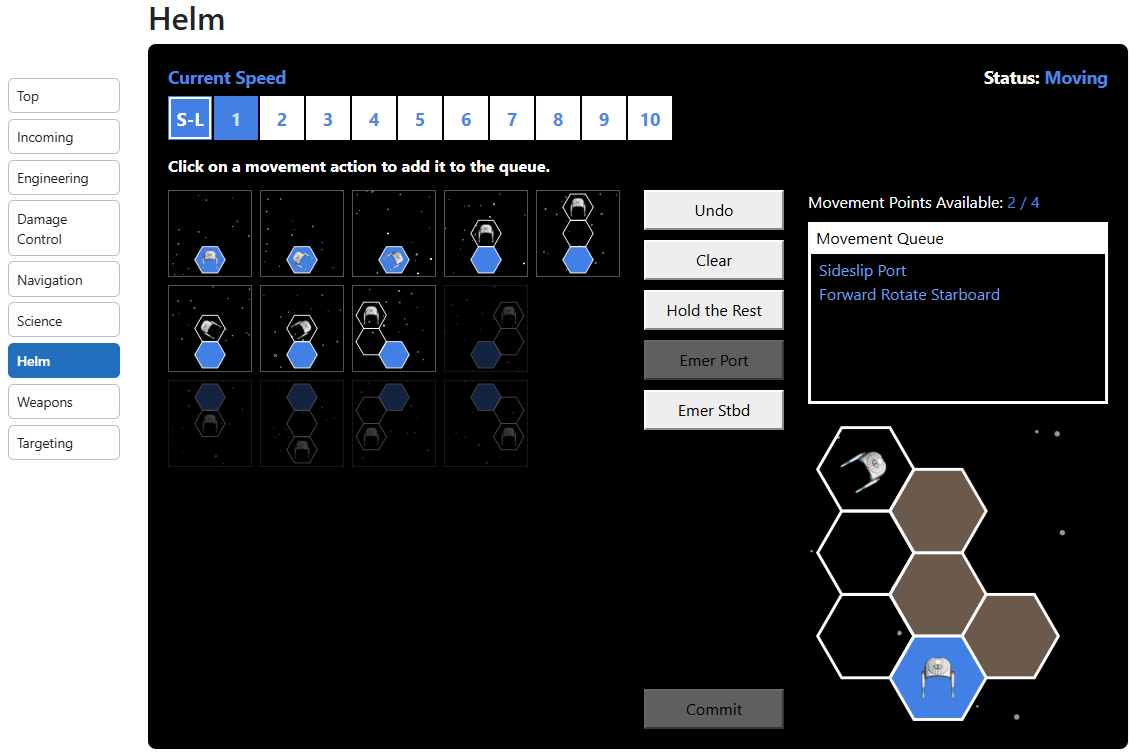
You can see some of the hexes filled in. That’s because the ship is navigating around a planet. You can also see reverse movement dimmed because of the forward movement, and one forward movement dimmed because it would cause a collision with the planet. The others are still lit and can be clicked to add to the queue that’s not full. Because one of the movements involved starboard rotation, the ship now has the ability to rotate an additional hex side as an emergency heading change; hence, the enabled button.
I intend to allow the admin to employ a house rule requiring all movement to be performed at the same time, but the rules don’t read that way, so it hasn’t been implemented yet. Note that such a house rule practically eliminates tactical advantage from the game, so I can’t make it the default rule.
After this movement, you’ll then have three more buttons appear, replacing those five.
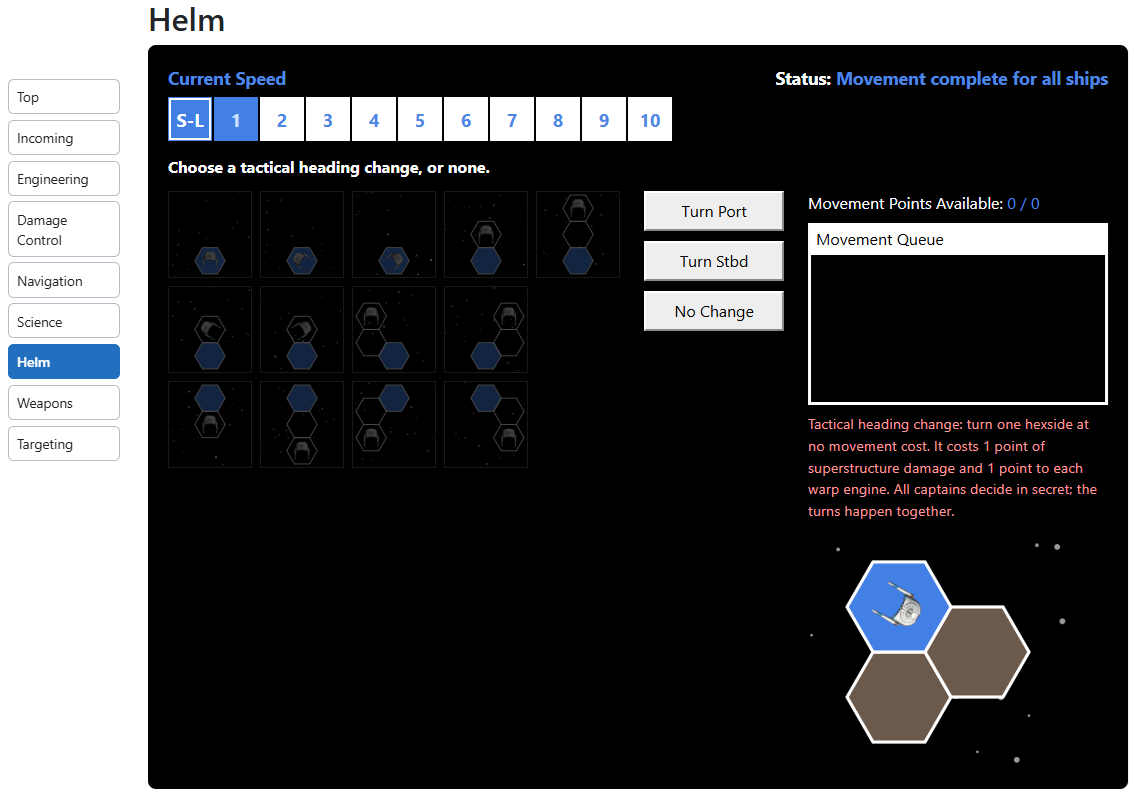
Everyone will be given the option of a tactical heading change to port or starboard, or in the alternative No Change (with the appropriate warning text for damage). In other words, the movement phase is divided into two segments: normal movement (performed in tactical advantage order) and then tactical heading (performed simultaneously).
Warping out (not shown here) is implemented from the Helm but during different phases depending on the ruleset. The skill roll allowing a ship to warp out by a change in two warp factors is handled during the C&C skill roll phase, and if the engineer’s roll succeeds, additional warp speed lamps are lit.
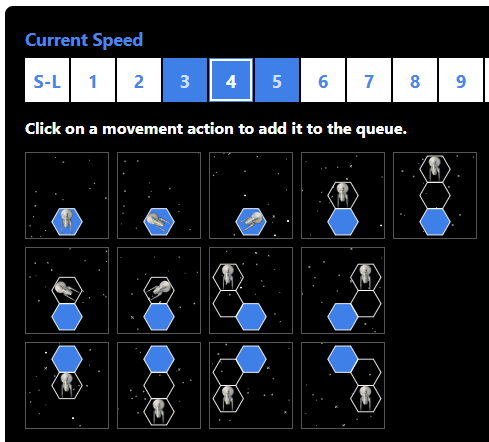
Now that you’ve moved, it’s on to weapons.
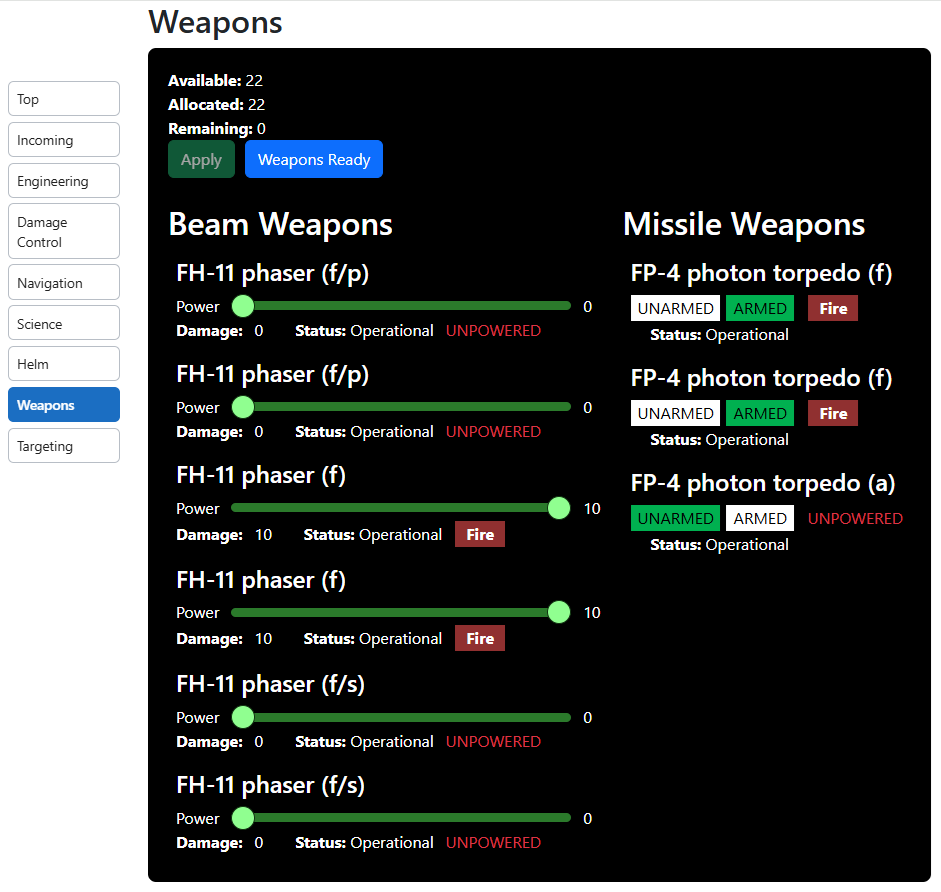
Like the Helm, the Weapons phase is divided into multiple segments, but more than just two. In the first segment, everyone simultaneously chooses which weapons to fire. If a weapon has no valid targets, you won’t be able to fire it no matter how many times you press the button. You’ll get a message telling you so. Once you’re done with your selections, if you aren’t firing all weapons, you’ll need to hit the Weapons Ready button to proceed. Everyone will receive a message that they’re waiting for others to compete their firing selections. Note: There’s now a Fire All button that fires all weapons that have valid targets that aren’t allies. If you click that, those weapons fire, and you won’t have to click Weapons Ready. This brings you to the targeting segment (which will eventually be merged into the weapons console rather than appear below it).
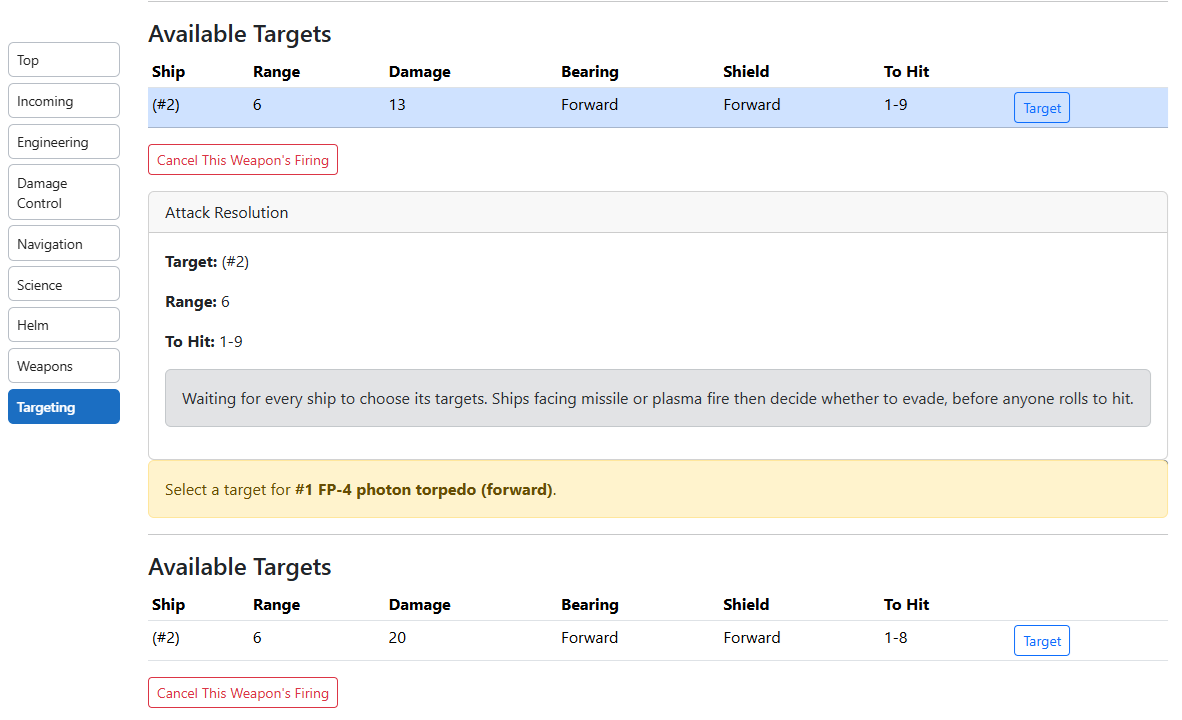
Here, you can see that the bottom weapon hasn’t yet chosen its target. In this case, there’s only one valid target, but there will be a list of multiple valid targets where such targets exist. The top weapon has already chosen its target and therefore displays a message that it’s waiting for other ships to choose theirs. Once everyone has chosen their targets, we move on to the attack and damage resolution segment.
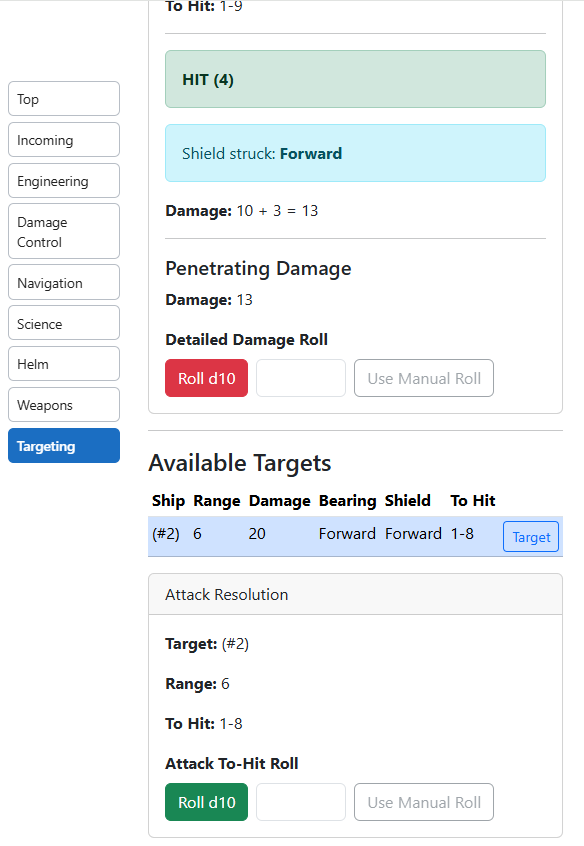
The top weapon has already rolled its (successful) to-hit die. It therefore received a message as to how much penetrating damage was done, so now the player is being asked how to resolve such damage. So, what if the weapon is a missile weapon (i.e., photon torpedo, energy torpedo, or Romulan plasma torpedo)? Then the target ship’s console is jumped to Incoming.
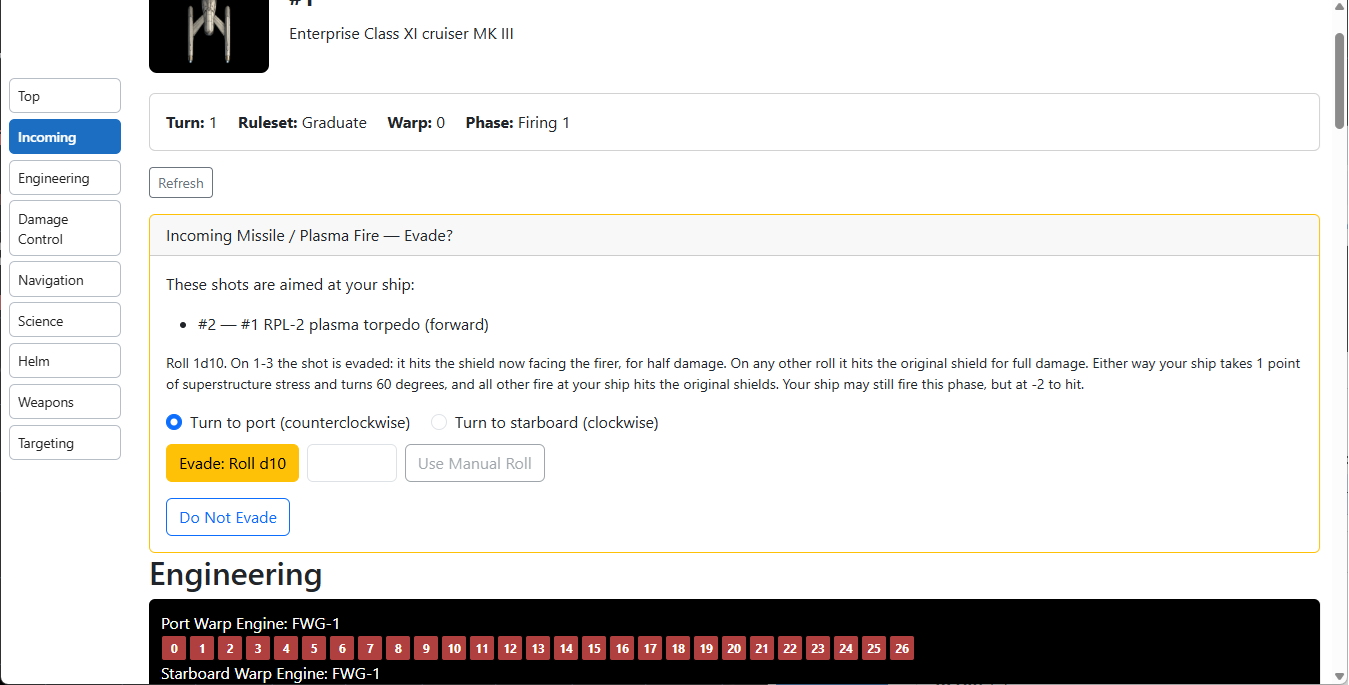
The target ship gets a chance to evade either to port or starboard. But this is a Romulan plasma torpedo, so in addition to evasion, there’s an additional option.

Here, the captain may attempt a skillful maneuver. Again, all of these options will be better organized on the Captain’s console (q.v.) once it exists.
Okay, I skipped one: the Damage Control console. In Basic and Advanced, it’s boring. It’s just shows superstructure. So, here it is in Graduate.
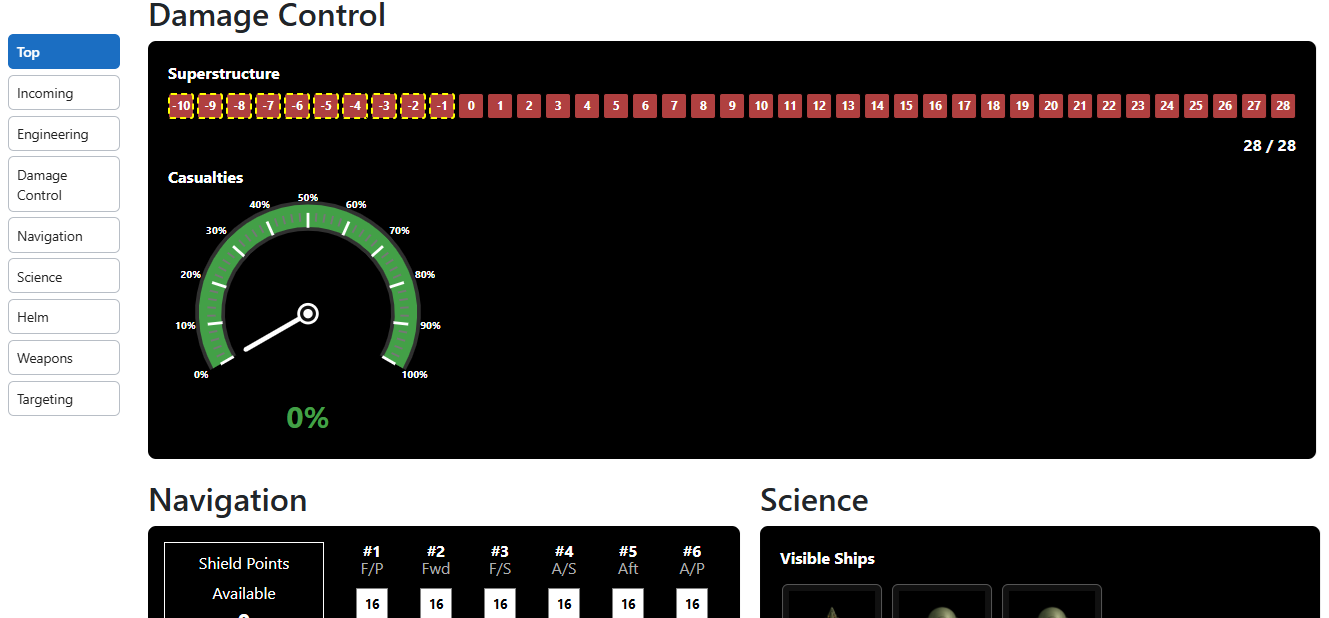
Maybe that’s still boring, but as a ship gets damaged, the Damage Control console will provide options for repairs.
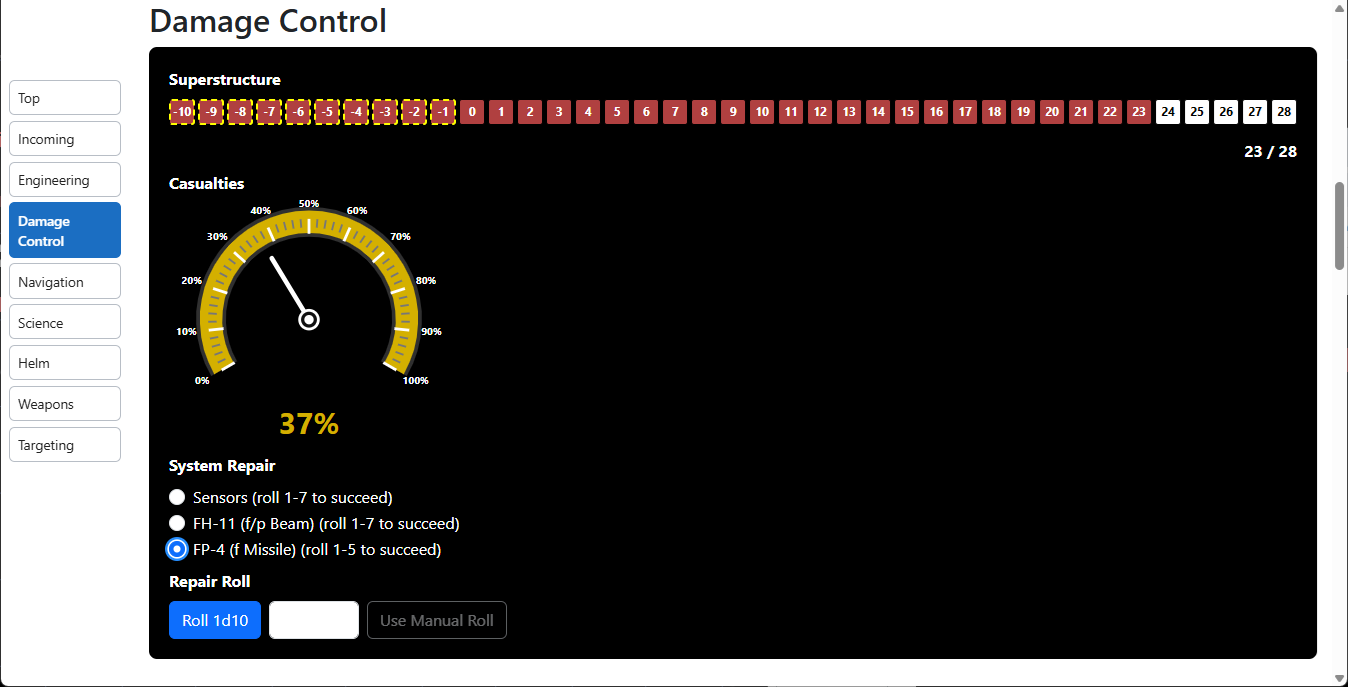
The Use Manual Roll button will be much clearer if you enter a roll in the text box. Basic doesn’t allow repairs, Advanced doesn’t allow repairs of weapons, and C&C allows repairs but without a separate Repair/Repower phase. So, there are a few different ways repairs are dealt with on this console. If you understand it in one ruleset, you’ll have no problem adjusting to the others.
How Does It Play?
This is a question for you to answer. My goal was to create a digital tool that still felt like you were playing the tabletop RPG. I know there’s one on Stream, but I’ve never been able to play it. I can’t even tell you why. Was I supposed to pay a fee? Is it available only when announced? Do you have to receive more than a public announcement to be invited? I have reason to believe any one of those could be true, but I really have no idea which, if any, are. It never seems to be available to me when I’ve tried. I also had a desktop version from back in the early 2010s, and I appreciated it, but it played like a video game. You weren’t really managing the mechanics of the game yourself. If you want to play this, just navigate to the site and start playing against anyone else that wants to play. You don’t have to send me any money, and you don’t wait for me to tell you it’s okay. You just have to find a frenemy to destroy. Ideally, this will bring you back to the 80s and feel like you’re playing the TTRPG. Just please let me know if you find any bugs or even things that don’t represent good game play. But before you do . . . .

It’s Not All Good News
There are some important limitations.
- Basic, Advanced, and Graduate are largely good to go. Quirks aside, you can use the apps to run skirmishes in those rulesets right now. While you can run a game in the Command & Control ruleset, you still must run the entire ship from a single window. In other words, the entire point of C&C — several players being assigned only some of the bridge officer positions for a single ship — isn’t implemented. Moreover, Engineering Hit isn’t quite ready for C&C, which means neither systems nor bridge personnel are shaken. So, if you run a game in C&C, you should expect to do so only as a curiosity to see how far along it is and to experience things like the Skill Rolls phase.
- As the game plays out, your web page will reload far more often than it should. You may be getting ready to arm weapons, then suddenly your page reloads and jumps back down to the weapons console because of something I did with my ship. It’s annoying as hell, but you’ll probably get used to it. You won’t have to live with it forever though. Seriously, be prepared to be annoyed.
- Sometimes the system can get stuck in one way or another. Clicking the Refresh button at the top of the page, or just reloading and “resubmitting” the page should fix the problem.
- Some of the sensor questions are missing, although most of them are questions I added that aren’t in the official rules.
- Speaking of house rules, my intent is to design the game exactly as the rules state, then provide the GM a series of optional rules to implement. Those house rule sensor questions will no longer be there by default once those “switches” are implemented.
- One of the switches will be to disable the manual rolling of dice. As of right now, every roll made can be done automatically by the system upon clicking a roll button or by manually entering the result of a physical die roll and clicking a Use Manual Roll button. I can imagine GMs wanting to ban manual rolls to reduce cheating, but for now, they can’t, so don’t cheat.
- I’m going to add a Captain’s Console in all rulesets that gives a player playing the Captain direct involvement in the digital aspect of the game. It will also better organize the information near the top of the page.
- Orion and Romulan ships can’t yet self-destruct. A GM will be able to allow any ship to self-destruct, but I currently plan for the default to allow Orions and Romulans to do so. The rules say Romulans only, but Journey to Babel suggests that Orions are willing to engage in suicide missions, so I’m allowing it by default. For now, if you don’t like that, simply agree among yourselves that Orion ships won’t self-destruct. No one’s ever forced to self-destruct.
- In keeping with what’s happened on the original TV show, I’m going to add a switch allowing a bridge officer in C&C to abandon his post and take over another, more critical post for a shaken officer. That’s not technically within the official rules, though, so you really won’t miss it yet. This, of course, means that the replacement officer’s original post will go unmanned, preventing, for example, gathering more information through sensors. The lock won’t be broken, but the questions won’t be askable while the Science Officer is firing weapons. Additionally, the players get one free bite at the apple. The Captain can take over a station as needed, and the only consequence will be that the Captain can’t add a 1d10 to his or her Starship Combat Strategy/Tactics skill rating when determining tactical advantage. Again, this will all be optional, but it’s consistent with how the show was written, so it honestly should have been contemplated by the rules.
- This one isn’t my fault. The Combat Efficiency (“CE”) system kind of sucks. I’m doing research and trying to piece together different alternatives for determining combat strength. Right now, the left side menu can display the CEs for all sides of the combat. I’ll add alternative measures of ship strengths when I compile them.
My current list of tasks is probably about 30 tasks long, so maybe any complaints you have that are not already listed here are in the queue anyway. I’ll eventually edit this post and show my pending task list so that you know what’s coming. Still, your comments are welcome. It can’t hurt to ask for things not knowing whether I’ve already thought of them.
Sample Scenarios: The White Flame Campaign
In the VTT, you can create, save, and load scenarios so that you can prepare for your game session ahead of time. These aren’t saved online; you save them to your hard drive as *.json files. If someone else wants to use your scenario, you can email them the rather small file(s). Speaking of which, I’ve created the scenarios for the White Flame supplement. Due to limitations in my WordPress account, I can’t upload them here and create links to them, and I’m not giving out links to my Dropbox account. Instead, I created separate pages that contain the contents of those *.json files. Simply copy the text for one file, then save it. The page title is the name I use for the file, but it doesn’t matter what you call them.
Scenario 1: Ayirn Patrol
Scenario 2: Operation Breakthrough
Scenario 3: Reprisal
Scenario 4: Asteroid Rain
Scenario 5: Hero’s Welcome
Scenario 6: The Hunt
Scenario 7: Starting off with a Bang
Eradiate Scenario 1
Eradiate Scenario 2
Eradiate Scenario 3
Eradiate Scenario 4
Eradiate Scenario 5: Honor Among Thieves
Eradiate Scenario 6: Betrayal
Eradiate Scenario 7: Speedy Response
Eradiate Scenario 8: Strength in Numbers
Note that loading a scenario currently wipes out the existing one, which means you can’t currently load a “second wave” (or subsequent wave) to a combat. That means that you’d have to take the time to load the subsequent waves in the middle of your session, or, as I’ve done, include them in the original session and ignore them until they need to be used. Also, some of these scenarios require that some ships start the scenario partially damaged, and freighters are carrying shipments that, if the freighter explodes, it does extra damage. Neither of those are implemented yet.
Give it a whirl, and let me know what you think.
Follow me on Twitter/X @gsllc
Follow me on Mastadon chirp.enworld.org/@gsllc
Follow me on MeWe robertbodine.52
Follow me on Blue Sky @robbodine

